How to Solve a Rubik's Cube
Welcome to the art of solving a Rubik’s cube. Learn how to solve it in just 7 simple steps!
Step 1: White cross
Step 1: – White cross
Unlike common misconception the Rubik’s cube is not solved side by side and is actually solved layer by layer.
The cross has to be completed for the cube to be solved and can be done on any side but traditionally it is done on the colour white.
The steps to solve the cross are the most simple out of all of it.
- Find any edge piece that has the colour white on it.
- Find the other colour on the edge piece and match that up to its centrepiece – this should only take 2-3 moves to complete
- Now that that is matched rotate the side until the white part of the edge is matched with the white centre
- Repeat as many times as is needed until the white cross Is completed and all the centres match
Step 2: White corners
To complete the white side the corners need to be put into place.
To do this you will need to find a corner piece that has white on it. Then check if it is on the top layer, if it isn’t then we will need to learn the right hand algorithm! (If it is on the top then skip to the next step.) This will allow you to adjust the corner without messing up the rest of the cube.
Right hand algorithm: R U R’ U’
Once the corner is on the top layer then we can move onto the next step. Check the other colours on the corner piece this will let you know where this piece needs to go, once you have figured this out rotate the top layer until the corner is between the other two colours on it. Then repeat the algorithm learnt earlier until the white side is faced down. This should now be in the correct place. Repeat this for the rest of the corners until they are all done.
Step 3: Second layer
The second layer is slightly more difficult as it contains less steps but more difficult algorithms. It only involves two algorithms, the left and right algorithm.
Left
U’ L’ U L U F U’ F’
Right
U R U’ R’ U’ F’ U F
Find any edge piece that you may need (that doesn’t contain yellow) and match the colour facing you to the colour of a centre piece. then move that piece in the opposite location to where it needs to go so if it needs to go to the right of where it is (once lined up) then do the right algorithm and the left if it needs to go to the left.
When the edge piece is on the right spot but oriented wrong or it’s not in the upper layer you’ll have to fix it in two steps, first it needs to be taken to the top of the cube. By using either the right Or left algorithm depending on which side of the cube it is on (you an just rotate the cube if you find one easier than the other)
Repeat this until the entire second layer is done.
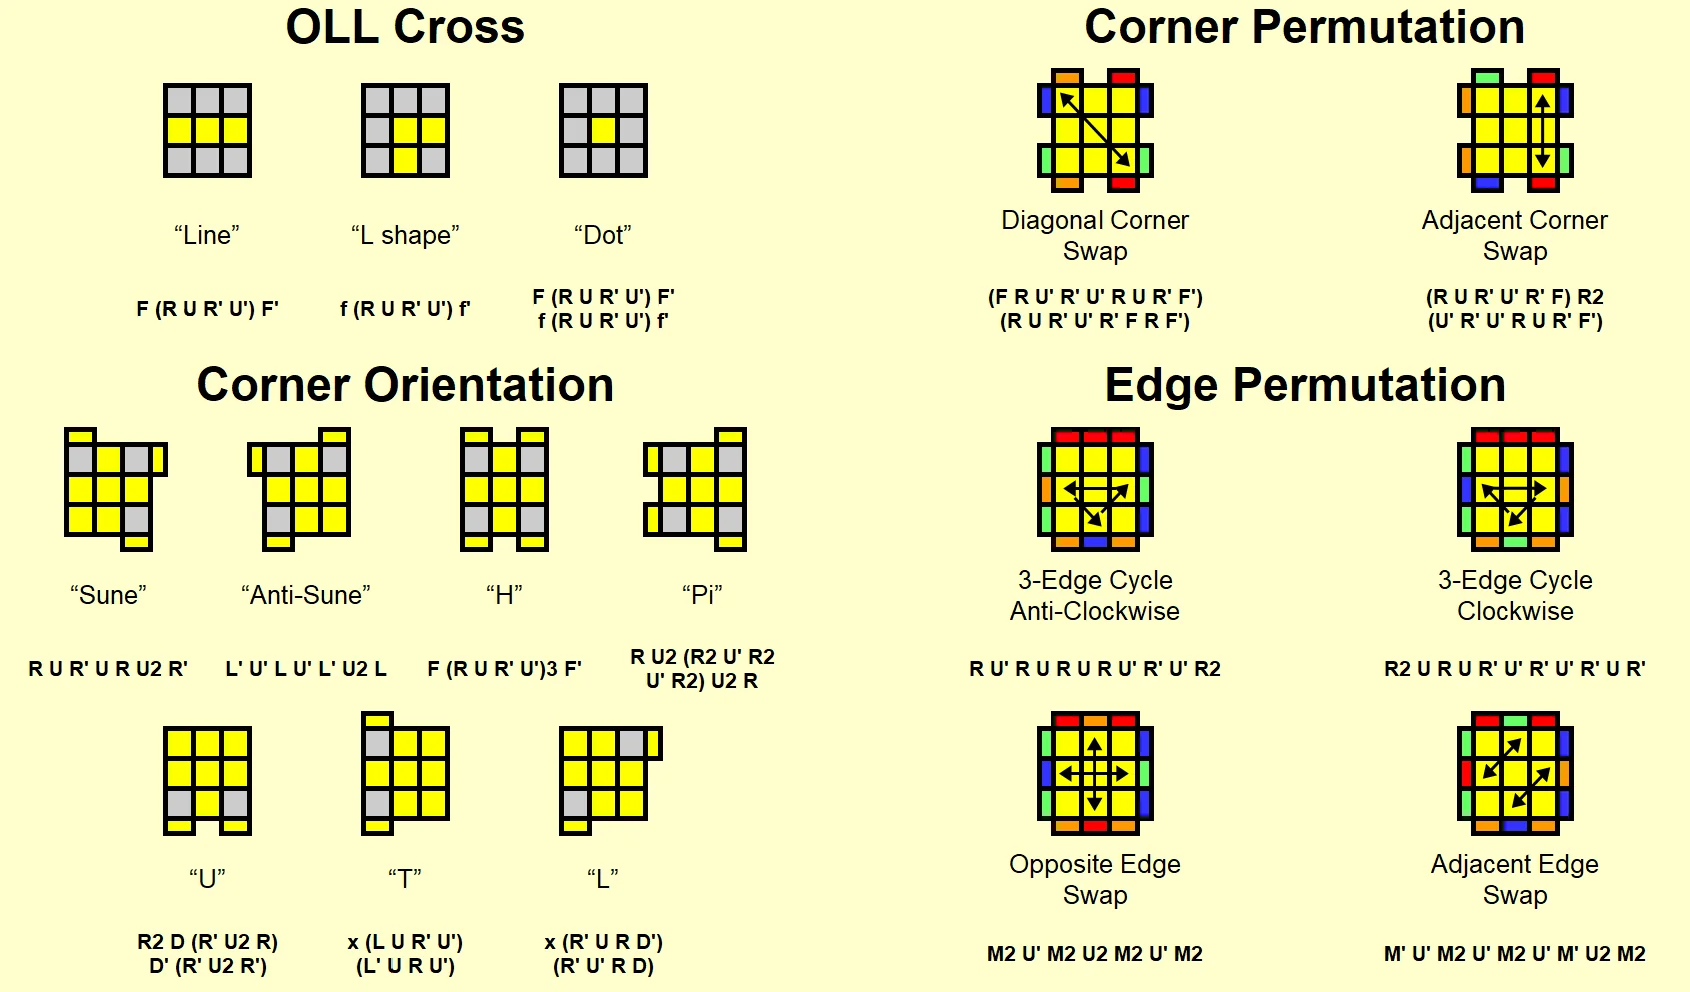
Step 4: yellow cross
There are three cases for the yellow cross that you will come across. For the line case the line has to be horizontal before doing the algorithm otherwise it won’t work as normal.
Algorithm: – F R U R’ U’ F’
For the small L situation it has to be facing like an L that was written the wrong way around before doing the algorithm.
Algorithm: – F R U R’ U’ F’ x2
For the dot situation it doesn’t actually matter which orientation it is as long as you do it right.
Algorithm: – R U2 R2’ F R F’ U2 R’ F R F’
Step 5: Corner Permutation
Corner permutation is a fairly easy and quick section to get through.
Diagonal
F R U’ R’ U’ R U R’ F’ R U R’ U’ R’ F R F’
Adjacent
R U R’ U’ R’ F R2 U’ R’ U’ R U R’ F’
Corner permutation in a Rubik’s Cube involves rearranging the corner pieces while keeping the edges fixed. It’s a crucial step in solving the cube, achieved through specific algorithms to move corners to their correct positions without changing their orientations. Mastering this step requires understanding corner relationships and executing precise sequences of moves for a solved state.
Step 6: Solving the yellow side
For the final steps it gets more complicated due to a very precise set of movements
Now that you have the corners in place we can flip the cube upside down so that the yellow face is facing down.
We then have to do the right hand algorithm over and over again until the yellow face is facing down (This will look like It is messing up the cube but don’t panic).
Then move the bottom layer clockwise once and repeat (unless yellow is already face down) until all corners have yellow facing down. (Don’t move it anti clockwise!) Now flip the cube back around.
Step 7: Edge permutation
Edge permutation in a Rubik’s Cube rearranges edge pieces while keeping corners fixed. It’s crucial for solving the cube, using specific algorithms to move edges to their correct positions without altering orientations. Understanding edge relationships and executing precise moves are essential for achieving a solved state.
To do this we must learn some new algorithms.
3 edge anticlockwise: R U’ R U R U R U’ R’ U’ R2
3 edge clockwise: R2 U R U R’ U’ R’ U’ R’ U’ R’
Opposite edge swap: M2 U’ M2 U2 M2 U’ M2
Adjacent edge swap: M’ U’ M2 U’ M2 U’ M’ U2 M2
Now you should be finished with your Rubik’s cube solve! Keep practicing to get faster and faster and you’ll be making new world records in no time!